Print Finishing Set Up Guide
Print Finishing: Guide & Setup
Print finishing is the final, and often overlooked, stage of the printing process. Without proper planning, it can lead to confusion, unnecessary revisions and time-consuming reworks. In this guide, GD Prints 40 years of print industry experience will help to explain the most popular print finishes, their common use cases and how to prepare your artwork correctly for each finishing process.
Lamination
Lamination comes in 3 formats: Gloss, Matt and Spot UV. Matt and Gloss require no set up and often come free with many business cards, but Spot UV requires a precise set up that differs from each printer.
| Matt Lamination Matt lamination improves the durability and longevity of your print. It helps protect against scratches, moisture, UV exposure and general wear. Visually, matt lamination produces a smooth, low-sheen finish that reduces glare. Because matt lamination is applied after printing, it can slightly soften or mute colours compared to an unlaminated print. If your design relies on particularly vibrant colours, it’s worth considering this during the design process and making subtle colour adjustments where appropriate to compensate. Gloss Laminate Gloss lamination provides the same protective benefits as matt lamination, helping to improve the durability of your print while protecting it against moisture, UV exposure and general wear. The key difference is its high-gloss, reflective finish, which enhances colour vibrancy and gives printed products a bright, eye-catching appearance. Because of its reflective finish, gloss lamination is particularly well suited to product packaging, where it helps products stand out on shop shelves by catching and reflecting light. While many premium print products now use Spot UV to create more targeted glossy highlights, gloss lamination remains a popular and cost-effective choice for packaging, brochures, postcards and business cards where bold, vibrant colours are preferred. Spot UV Spot UV is a selective gloss finish applied to specific areas of your printed product, typically used to highlight logos, graphics or text. Unlike a full gloss laminate, spot UV creates contrast by adding a high-gloss finish only where it is needed, producing a more refined and eye-catching effect while drawing attention to key design elements. Spot UV laminate is commonly applied over a matt laminate, combining the durability of the laminate with the visual impact of a glossy finish. The result is a predominantly matt surface with striking gloss highlights, offering both excellent protection and a premium, tactile appearance. | 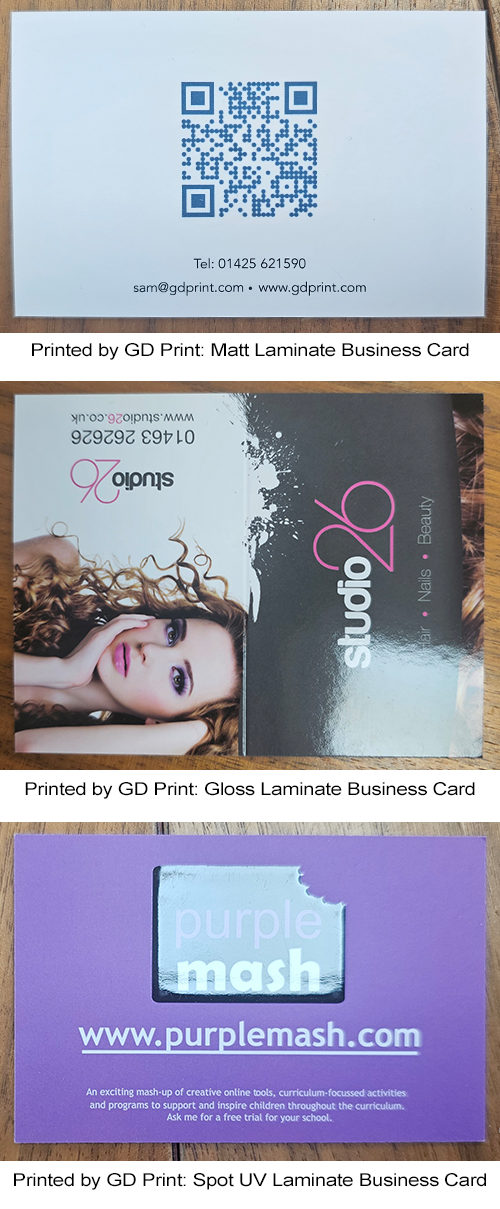 |
Setting Up Spot UV
Setting up spot uv requires a very specific set up that may be confusing to people new to the process. Each printer requires different setup, so we will break down how to print spot uv with GD Print.
Start with your Design The first step is making sure that your print is ready for production, you want to ensure you have the raw file ready In your ideal editing software. If you are unsure how to make sure that your print is ready, check out our article here. Prepare your Raw File Make sure your file is organised efficiently, correct layers, files types that can be edited, correctly sized bitmap files or editable vectors and areas in mind that you would like to be in Spot UV. Once these are all correctly planned, you can begin setting up your spot UV file. At GD Print, we use the Adobe Suite, so we will use these tools as our visual examples. Seperate your Pages Start by separating and copying the elements you want to apply Spot UV to onto a separate page within your document. This page will act as the guide the printer uses when applying the varnish. If you want to apply Spot UV to an image, ensure it is in a vector format where possible, as this makes the next step much easier. If the image is a bitmap, create a copy of it and fill it with a solid colour. This ensures the Spot UV area can be easily identified and selected, provided the bitmap is not too complex. Change Colours to Magenta Change your the colours of the copied elements to Magenta, if this is text or a vector image, you should be able to select and recolor them with relative ease, bitmaps you must repeat the steps mentioned in the above paragraph for a full spot UV cover. Alternatively, if you want a partial Spot UV cover, select specific areas of the image and fill those with a magenta solid fill. Admire your Spot UV Ready File Your final document should contain all pages for each side of your design, along with an additional corresponding page for each side containing the magenta elements you want to apply Spot UV to. For a standard double sided business card for example, you would be looking to have 4 pages: Frontside, Backside, Frontside Spot UV, Backside Spot UV. You now have a print-ready file. Apply any required bleed and crop marks, then export the document as a PDF and it will be ready for print. If you are unsure about any part of the process, contact GD Print and our team can help you prepare your Spot UV artwork and ensure your file is ready for printing. | 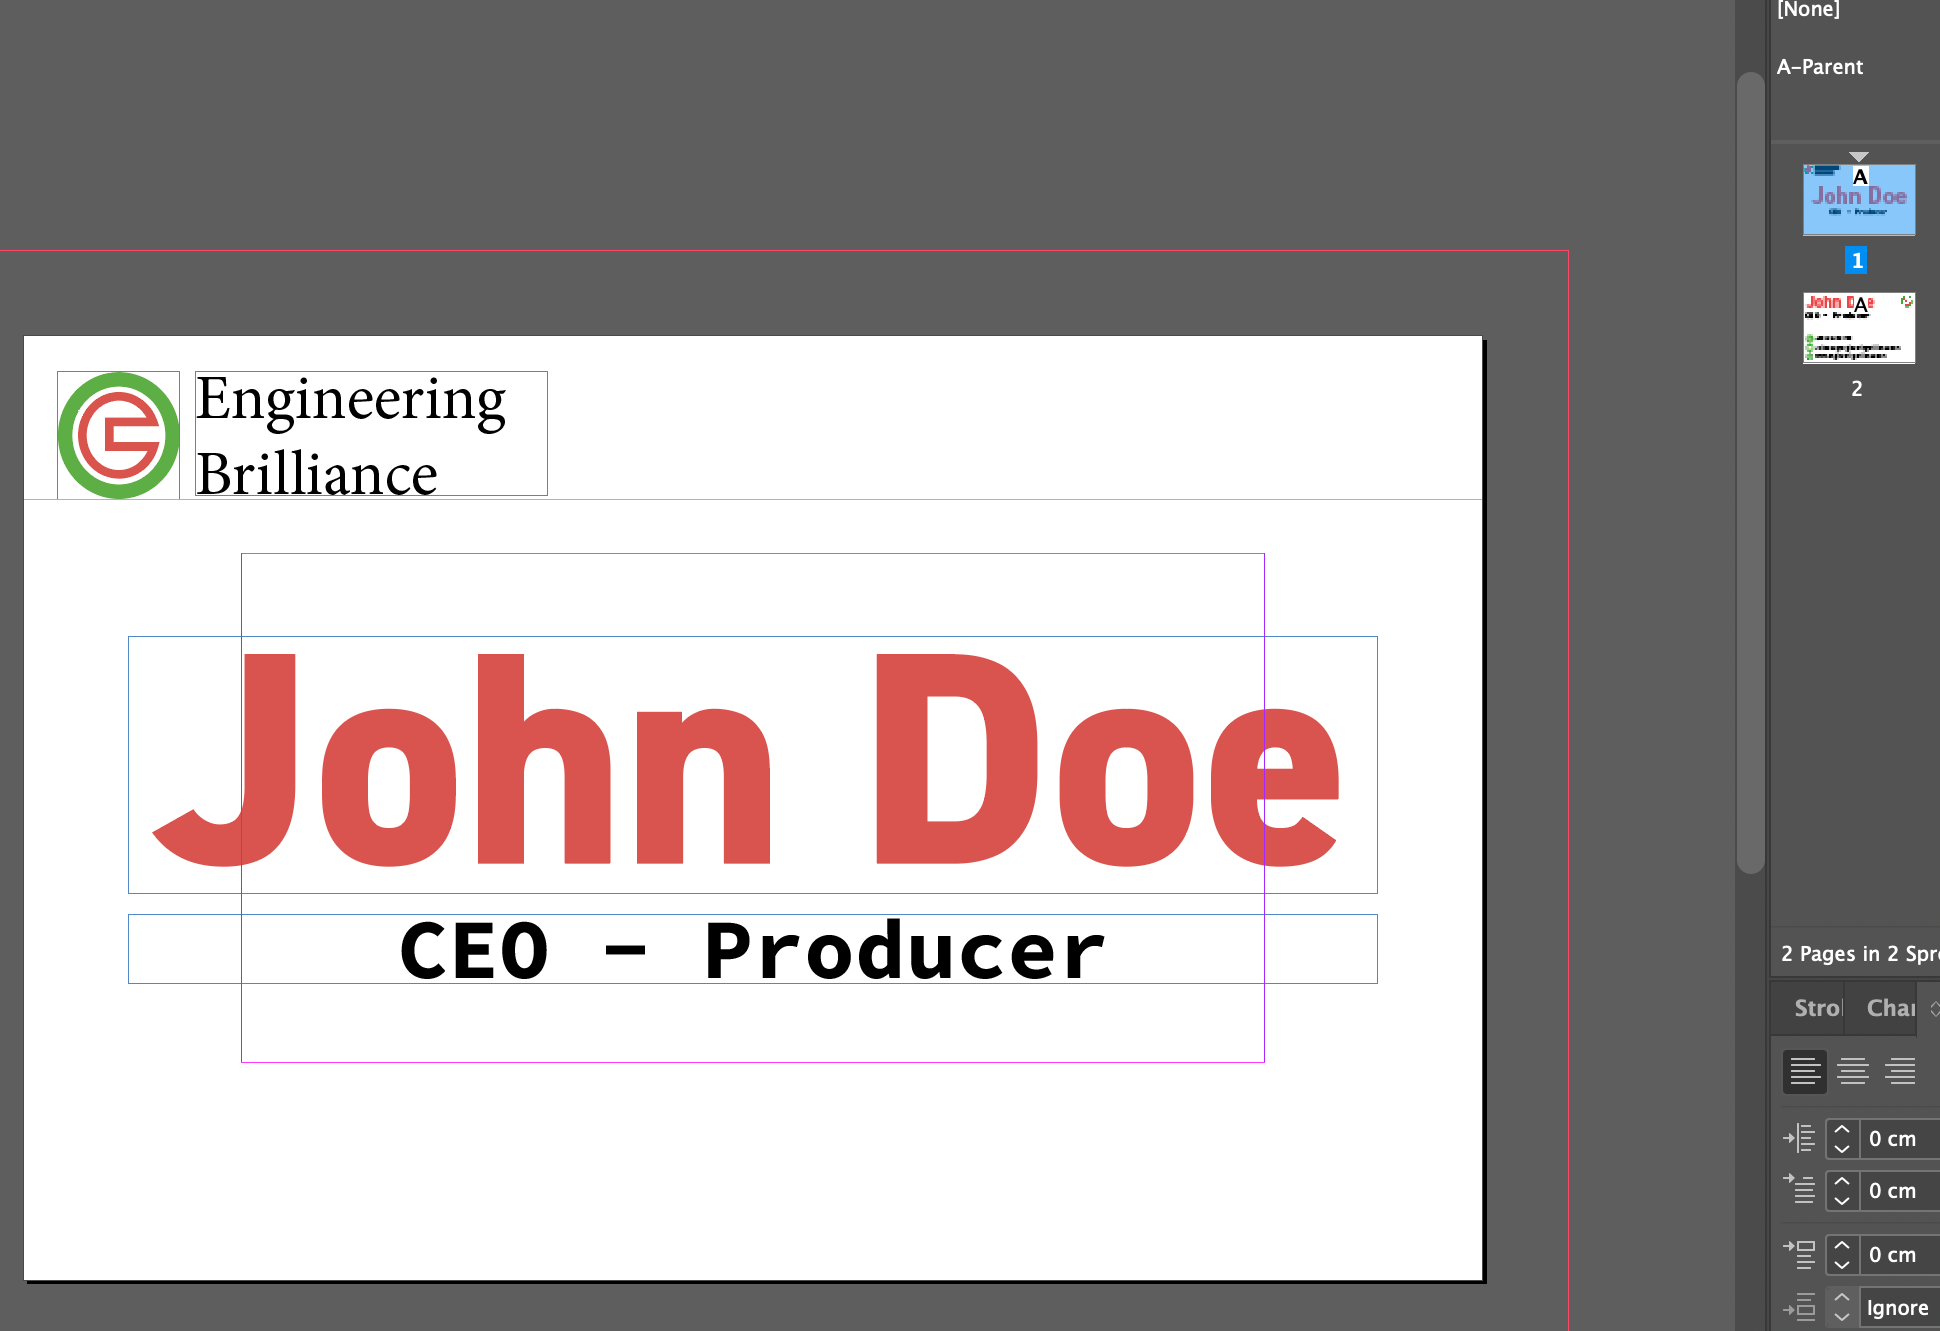 Step One: Spot UV Ready Design Step One: Spot UV Ready Design  Step Two: Separate the Pages Step Two: Separate the Pages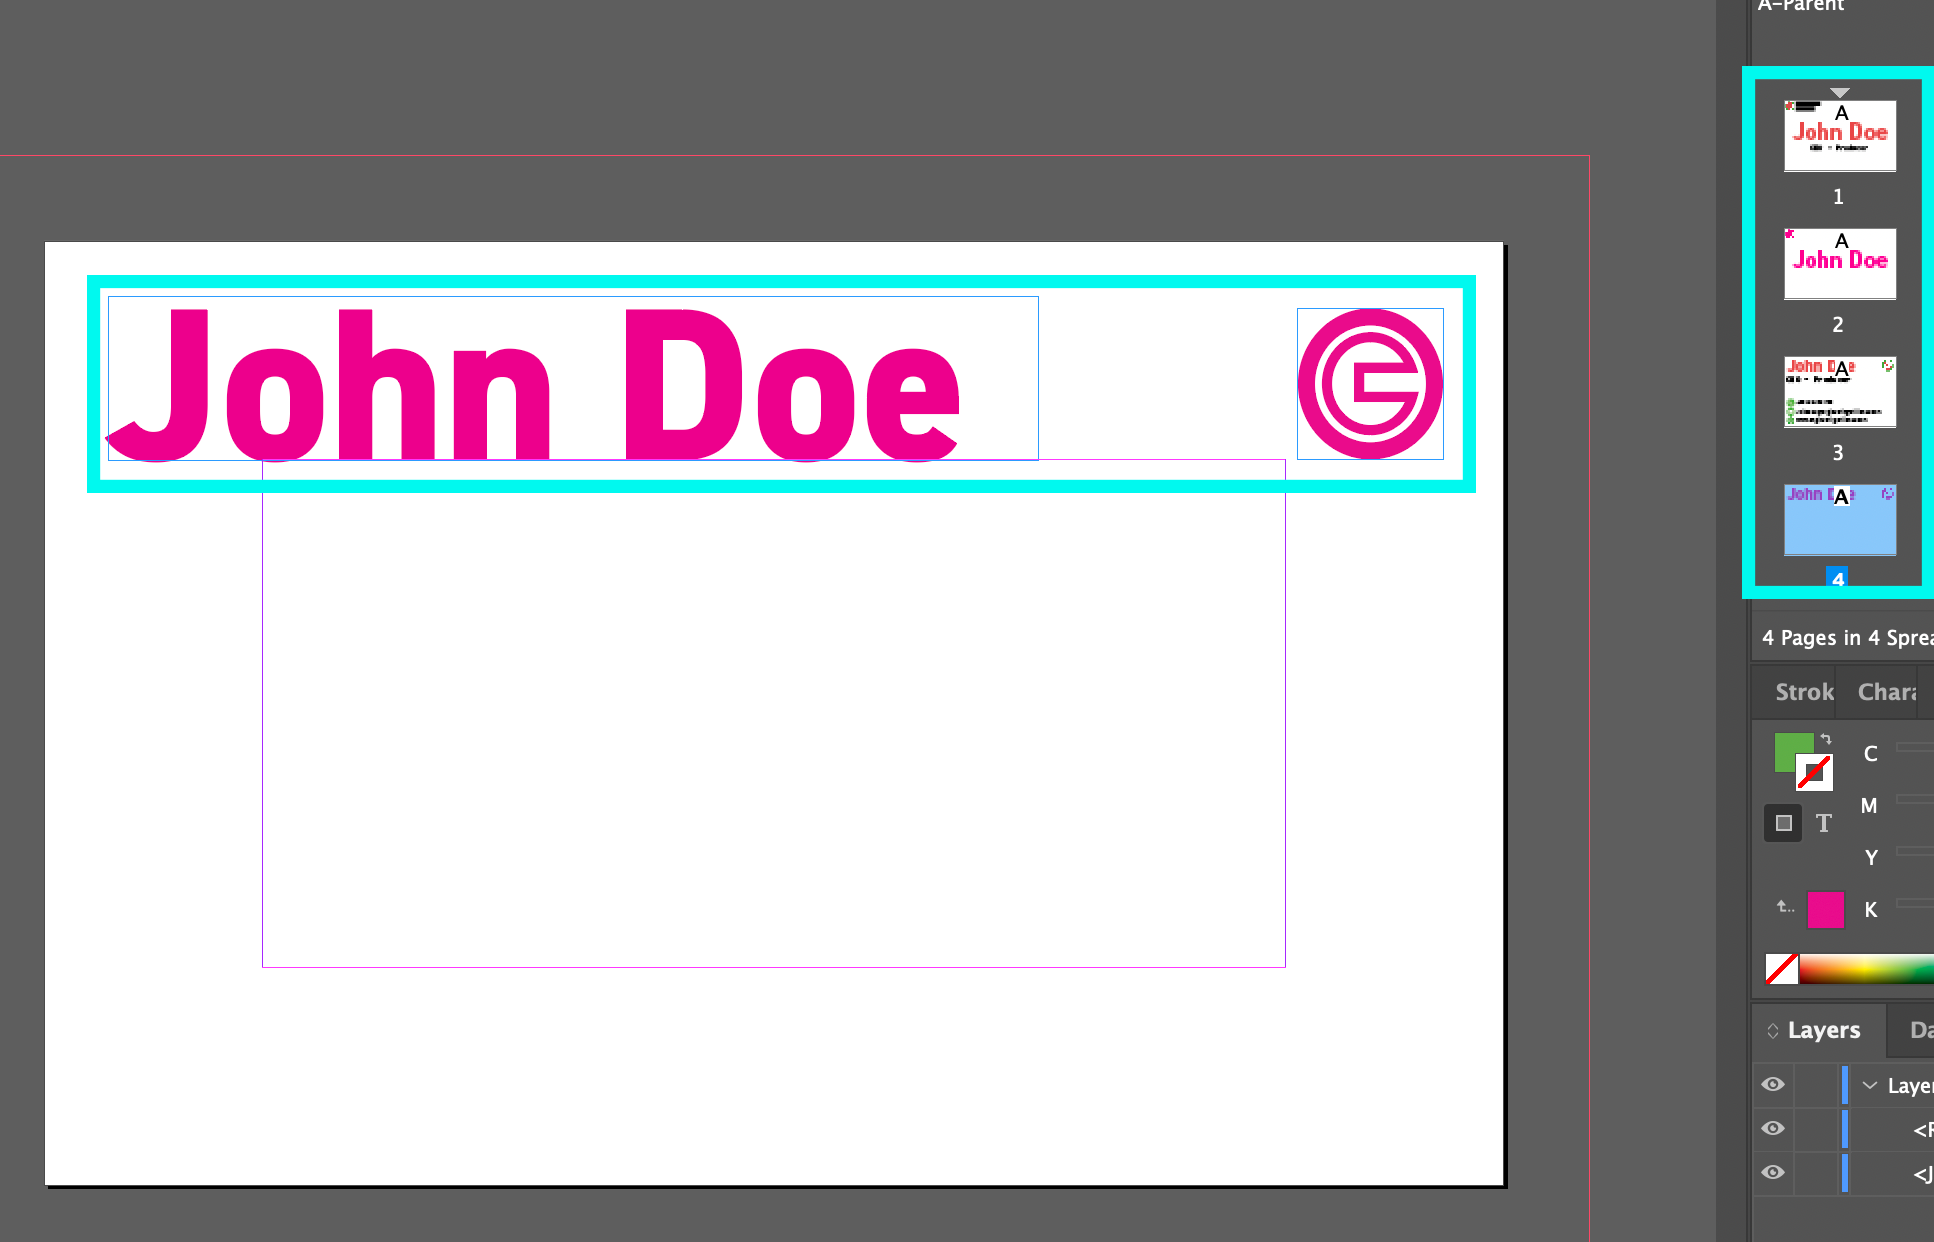 Step Three:Turn to Magenta Step Three:Turn to Magenta |
Embossing
Embossing and Debossing is a print finishing technique that raises or lowers selected areas of a printed product to create a three-dimensional effect. Often used to enhance logos, text and decorative elements, embossing and debossing adds depth and a premium feel to business cards, packaging, invitations and other high-end printed materials. Below, we’ll explore the different types of embossing and how each can enhance your printed products.
| Embossing Embossing raises selected areas of a material to create a three-dimensional, textured effect. Used across industries including fashion, bookbinding and trading cards, it adds a premium feel to products and packaging. Traditional embossing requires a custom-made die for each design, making setup expensive and best suited to larger print runs. Once the die has been created, however, it can be used throughout the production run, significantly reducing the cost per item. This is why embossed products are often associated with premium printing and remain relatively uncommon. Modern alternatives, such as digital ink embossing, can create a similar raised effect more cost-effectively. However, traditional embossing still offers a unique physical quality and natural tactile finish that digital alternatives cannot fully replicate. Debossing Debossing is the opposite of embossing, pressing a design into a material to create a recessed, three-dimensional effect. The result can be felt as you run your hand across the surface and is sometimes used on products such as books, stationery and packaging. Because debossing requires enough material thickness to withstand the pressure without tearing or breaking, it is less common in commercial printing than embossing. The recessed effect also generally needs to be deeper to be clearly visible, limiting its use further. Unlike embossing, there are few modern alternatives that replicate the same recessed effect. Debossing remains a niche and relatively expensive finishing technique, with the pressure involved potentially damaging unsuitable materials. As a result, embossing is often preferred when a tactile, three-dimensional finish is required. Digital Ink (Scodix)Scodix digital embossing is a premium print finishing technology that uses a clear, UV-curable polymer to create raised, tactile effects on printed products. Unlike traditional embossing, which requires custom-made metal dies, Scodix applies the polymer digitally before instantly curing it with UV light. This allows for highly detailed raised textures, Spot UV effects and even digital foiling without the cost or setup associated with conventional embossing. The technology is ideal for short and medium print runs, making premium finishes more accessible and cost-effective. Common applications include raised logos, text and graphics on business cards, brochures, packaging and book covers, as well as textured finishes and variable data that can be customised on every individual print. The result is a striking, tactile finish that enhances both the appearance and perceived quality of your printed products. | 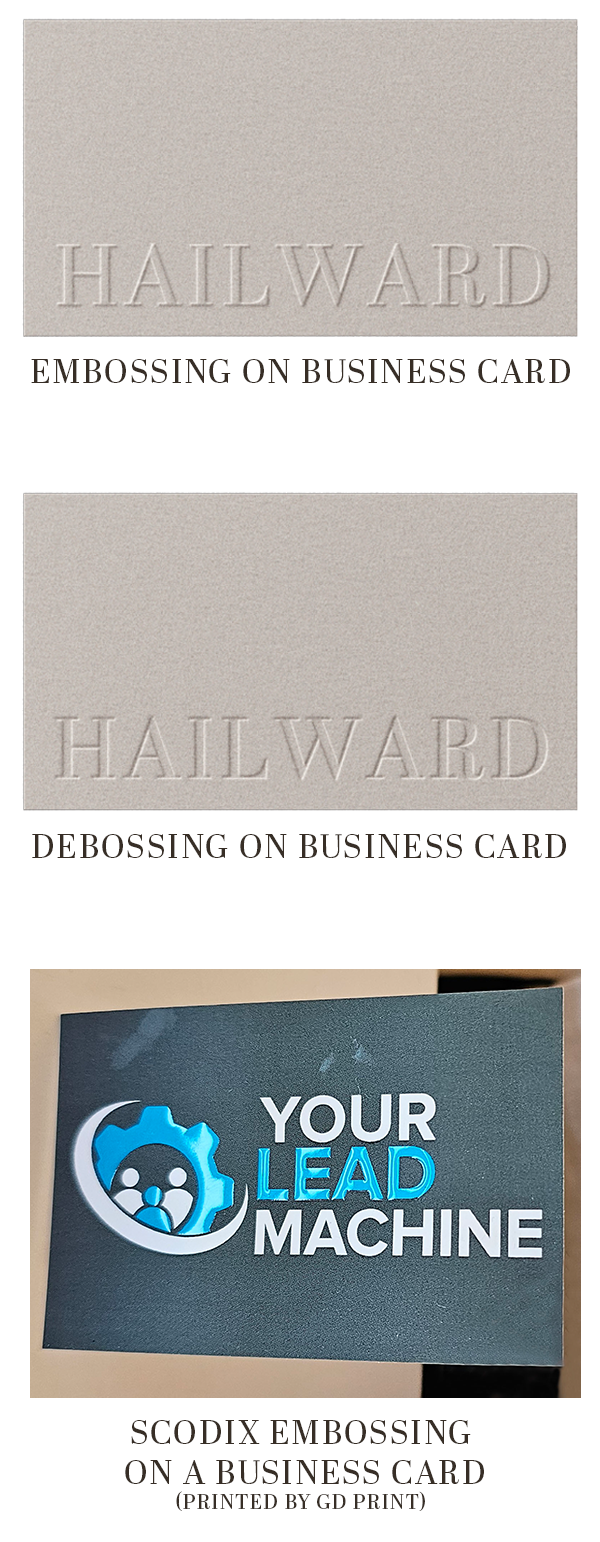 |
Foil & White Ink
Foil printing and white ink printing are two specialist finishing techniques that help your print stand out. Whether it’s the reflective, eye-catching appearance of foil or the bold, high-contrast finish of white ink on dark materials, both offer a distinctive premium effect.
| Foil Foil printing is a premium finishing technique that adds a reflective metallic surface to selected areas of a printed product. Traditionally, this is achieved by transferring a metallic foil onto the paper using heat, pressure and a custom-made die. The result is a luxurious finish commonly used to highlight logos, text and decorative elements on business cards, invitations, packaging and other premium print products. Modern digital foiling, such as the technology used by GD Print, offers a more efficient alternative for short to medium print runs. Rather than using a metal die, a specialised digital toner or UV-curable adhesive is printed onto the artwork before a metallic foil is bonded to those areas. This process doesn’t use metallic ink; instead, the foil adheres only where the adhesive or toner has been applied. Digital foiling is faster to set up, more cost-effective for lower quantities and capable of producing highly detailed, precise results, while still delivering the premium appearance associated with traditional foil printing. White Ink White ink printing is a specialist printing technique that allows vibrant white graphics, text and images to be printed directly onto dark, coloured or transparent materials. Unlike conventional printing, which relies on the white of the paper as its lightest colour, white ink creates high-contrast designs that stand out on substrates where standard inks would be ineffective. This makes it a popular choice for premium packaging, coloured card stocks, acrylic signage, window graphics and bespoke promotional products. Most conventional digital printers cannot print white ink because they do not have a dedicated white ink channel. Modern printing technology, such as that used by GD Print, overcomes this limitation by using specialist white ink systems capable of producing crisp, opaque results on a wide range of materials. Previously, white ink printing was typically reserved for expensive, large-volume production, but digital technology now makes it a cost-effective option for short and medium print runs, allowing businesses to achieve a distinctive, premium finish without the high setup costs of traditional methods. | 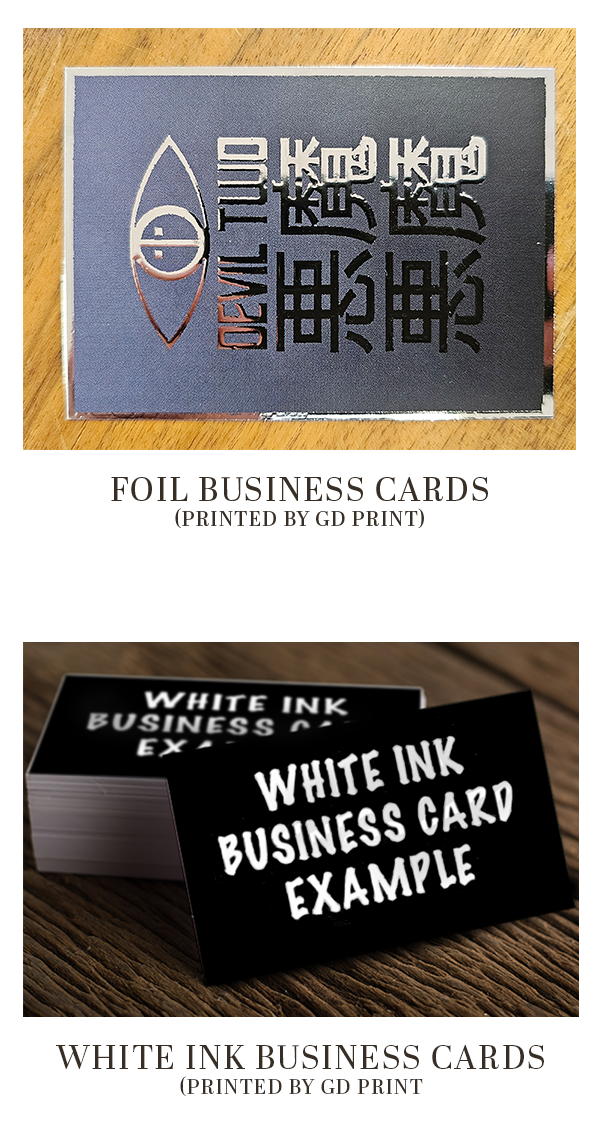 |
Cutting & Shaping
Cutting and shaping are print finishing techniques that physically alter the shape or structure of the finished piece. From rounded corners and perforations to custom die-cut shapes, these bespoke finishes can enhance both the appearance and functionality of a printed product. As they often require specialist equipment or custom tooling, they are typically among the more labour-intensive and premium print finishing options.
| Rounded Corners Rounded corners are a simple yet effective print finish that removes the sharp edges from a printed product. Commonly used on business cards, postcards, flyers and signage, rounded corners create a softer, more approachable appearance while giving the finished product a polished, professional feel. For more rigid materials, such as Foamex or aluminium signage, rounded corners also provide practical benefits. They help reduce the risk of injury from sharp edges and are less susceptible to knocks and damage, improving the durability and longevity of the printed product while maintaining a clean, finished appearance. PerforationPerforation is a print finishing technique that creates a series of small holes or cuts along a predetermined line, allowing part of a printed product to be torn away cleanly and easily. It is commonly used on tickets, vouchers, coupons, forms, raffle tickets and reply cards where a detachable section is required. As well as improving functionality, perforation provides a neat and professional finish compared to manually cutting or tearing a document. The position and pattern of the perforation can be tailored to suit the application, ensuring the tear-off section is both durable during handling and easy to remove when needed. Die CuttingDie cutting is a print finishing process that uses a custom-made die to cut printed materials into virtually any shape, going beyond the standard rectangle or square. This allows printers to create bespoke products tailored to a specific design, whether that’s custom packaging, uniquely shaped business cards, swing tags, folders or promotional materials. One of the most versatile finishing techniques in the print industry, die cutting combines creativity with practicality by enabling products to stand out while improving their functionality. Although it requires a custom cutting die, making it more cost-effective for larger print runs, the results are precise, consistent and capable of producing shapes that would be impossible to achieve with conventional trimming alone. Setting Up Technical Finishing Preparing artwork for technical finishing requires planning from the start of the design process. For rounded corners, ensure that important text, logos and other key design elements are positioned away from the edges of the artwork. It’s also important to decide how large you want the corner radius to be and check the minimum radius your printer can produce. Designing with these specifications in mind allows you to make changes non-destructively and ensures the finished product looks exactly as intended once the corners have been rounded. Preparing artwork for perforation and die cutting will vary depending on your chosen printer’s requirements. At GD Print, we ask for a cut path or perforation line to be supplied as a thin magenta stroke, indicating exactly where the cut or perforation should be applied. If you’re unable to create this yourself, we can amend an existing cut path free of charge or create one for you as part of our graphic design service. As every print company has its own artwork specifications, it’s always worth checking their guidelines before preparing your files. This helps ensure your artwork is set up correctly and avoids unnecessary delays or amendments before production. | 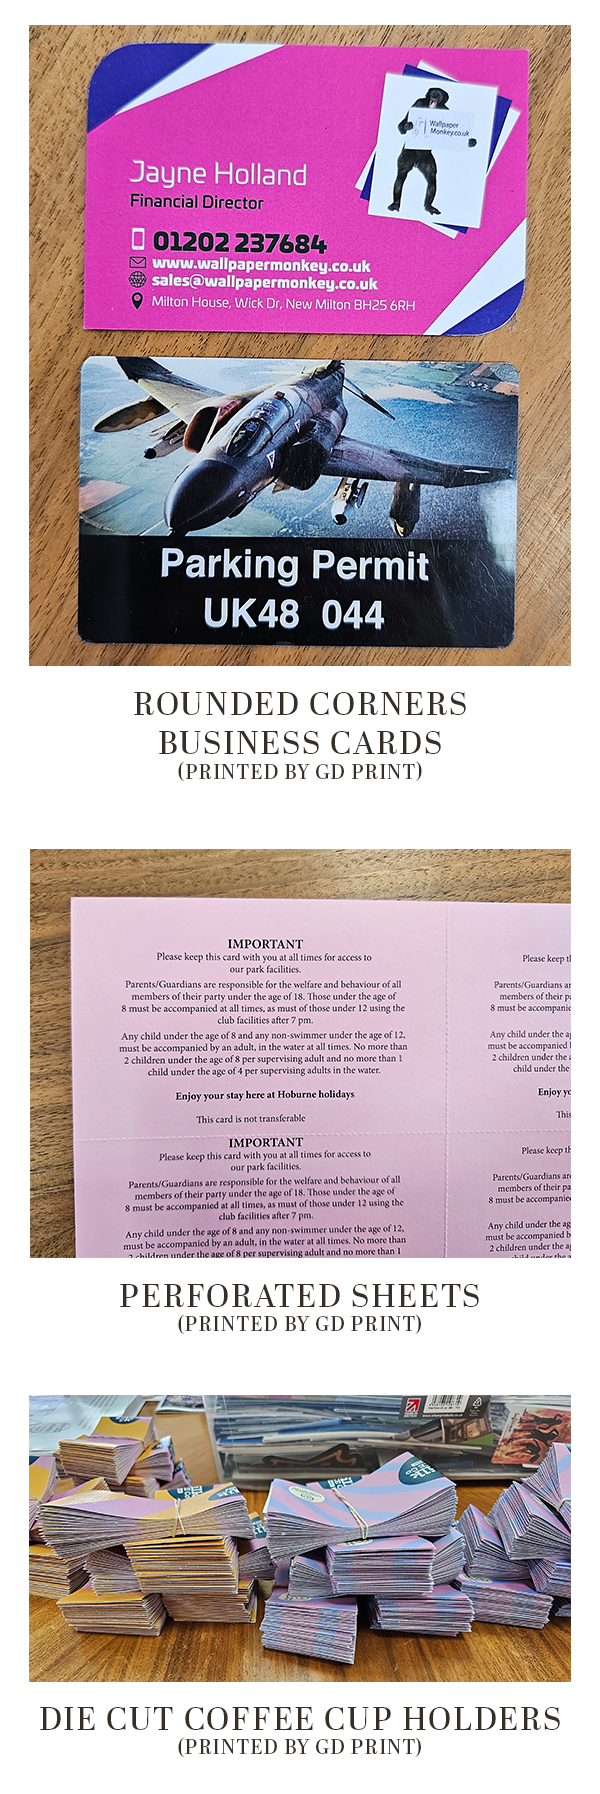 |
Conclusion
Print finishing is what transforms a good print into a great one. Whether you’re looking to enhance durability with lamination, add premium effects with Spot UV, foil or embossing, or create bespoke products through die cutting and perforation, choosing the right finish can significantly improve both the appearance and functionality of your printed materials.
By understanding how each finishing technique works and preparing your artwork correctly from the outset, you can avoid costly revisions and achieve the best possible results. If you’re ever unsure which finish is right for your project or how to prepare your files, the team at GD Print is always happy to help. With over 40 years of experience, premium in-house production and expert artwork support, we can guide you through the process and ensure your finished product looks exactly as you envisioned.
Bringing 40+ years of print expertise to businesses across the UK. GD Print is a professional print company based in New Milton, serving customers across Bournemouth, Southampton, and the UK. We specialise in custom vinyl stickers, wall decals, and eco-conscious printing solutions.

