How to Create a High Quality Optimal Print
High Quality Print Guide | Optimal Print UK
Creating a high quality print isn’t just about hitting “print” on your computer — it’s about preparing your files, images, and layouts so that your finished product looks sharp and professional. Whether you’re ordering posters, kitchen prints, bathroom prints, or large canvas prints, the same principles apply. In this guide with GD Print's 40+ years of experience, we’ll cover everything you need to know to achieve optimal print results in the UK.
Why Print Quality Matters
You want to know your finished piece will look exactly as intended. Poor resolution, the wrong file type, or incorrect sizes can ruin a project. Whether it’s banner printing, canvas printing, or simple black & white prints, setting up your files correctly ensures the best outcome. In fact, according to Jeff Stein from Fuse Box One, who quotes Statistics Brain, 72% of working professionals will base their judgments of a company on the look, feel, and design of their business cards alone. [Fuse Box One] This statistic doesn't even factor in other promotional aspects like posters, flyers or banners, or ensuring you get the impact you need for cost investment.
Step 1: Start with High-Resolution Images
The most important factor in achieving a high quality print is the resolution of your images. Resolution cannot be modified from its original source, except to reduce quality and file size. You cannot make a low-quality image high-quality, without losing its original information. Some tools may be able to help in improving quality, but this risks losing the original image's detail. You can resize an image from its native size but you risk losing quality, however this usually only applies when attempting to make small images larger. In some instances if you attempt to make a very large image, very small, you will lose quality, but this has to be a very drastic size difference. Here are some quick tips on what to avoid and what to choose when deciding on images for print: • Recommended resolution: 300 dpi (dots per inch) for professional printing. • Avoid using small, low-resolution web images, as they will appear pixelated when enlarged. • For large prints such as print posters or large canvas prints, ensure your original file is big enough to scale without losing clarity. | 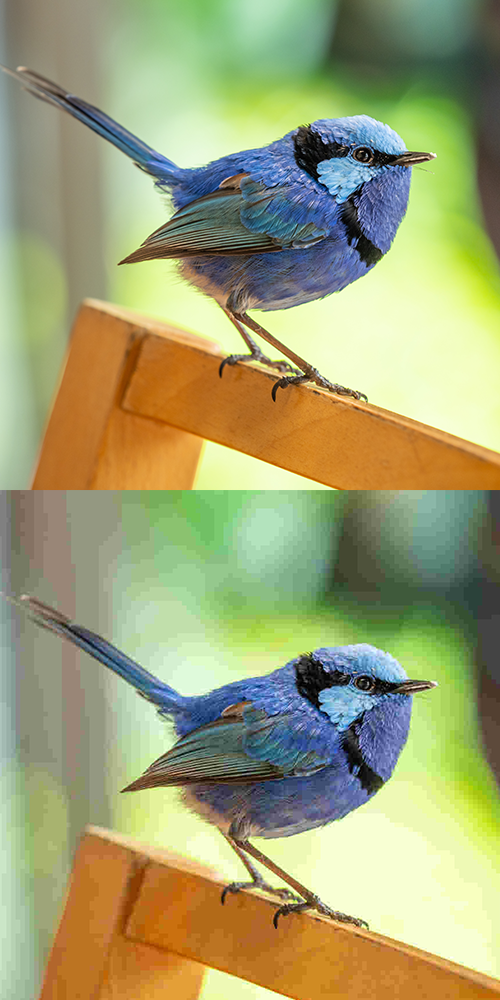 Reference: Top Image is High-Quality, Bottom Image is Low -Quality Reference: Top Image is High-Quality, Bottom Image is Low -Quality |
Step 2: Choose the Correct Document Size
Before you send your artwork to print, set your document size to match your final product. If you need help deciding or visualising some popular sizes, discover our article here.
• Using the right dimensions avoids stretching or cropping issues. If you incorrectly size your document you risk losing elements of it when the crop and bleed occurs in the printing process. If you need to learn more about this, check out our guide on bleed and crop marks.
• If you’re designing an A4 print, A3 print, or even larger banners, create your document at the exact size required. To learn more about some of the required sizes or pixels for these documents, discover our article here.
• For kitchen prints or bathroom prints or prints designed for a frame, confirm the frame size you’ll be using so your design fits perfectly. Additionally, make sure your frame or paper choice is resistant against moisture.
• For large format documents at billboard size or larger, work with vector images and text as much as possible to reduce the loss in quality when printing and save file size.
Step 3: Use the Right File Types
Printers work best with professional file formats. This saves time, cost and problems in the printing process. Some printers charge extra or won't print at all if your files are in incorrect formats or sizes, so ensuring these are correct Is a must. This means that designing in tools that can export into this format is equally as important, even though most modern design tools support exporting into these file types. Here is a breakdown of some of the most common file types.
• PDF: The most widely accepted format for print-ready files.
• TIFF / PNG: Ideal for high-quality images.
• JPEG: Acceptable for photos, but ensure they’re saved at the highest quality setting.
• Avoid Word or PowerPoint files: These often distort layouts and colours during printing.
GD Print also supports files in these formats, if you have more bespoke needs:
• PSD: Photoshop files with layers for detailed editing. Accepted by printers when set up correctly—GD Print supports PSD for high-quality printing.
• AI: Illustrator files are ideal for vector graphics and scalable designs. Widely accepted and fully supported by GD Print.
• INDD: InDesign files are perfect for layouts like brochures or booklets. GD Print accepts INDD for accurate, professional prints.
Step 4: Colour Settings for Printing
When preparing your design, you need to make sure that you are designing in the right colour format. In short, RGB is what you see on your computer screen whereas CMYK is what prints. In popular online editing software like Adobe Indesign, Photoshop and Illustrator you have the options to change the colour output on your screen, mimicking what you will see on paper. In summary:
• If colour reproduction is important Use CMYK colour mode, not RGB. CMYK (Cyan, Magenta, Yellow, Black) is the colour model used for professional printing.
• For black & white prints, set your design to grayscale for cleaner output.
For an in-depth look on the differences between the two, discover our article here.
Step 5: Match the Print to the Purpose
Different print types require slightly different preparation:
• Posters and banners → Larger files, bold designs, and correct scaling.
• Canvas printing → High-resolution photography or artwork for maximum detail.
• Print out pictures → Ensure personal photos are saved at the largest possible size for sharp results.
• Laser printer prints → Perfect for documents, contracts, and everyday black & white prints.
Step 6: Make Printing Easy with GD Print
Thanks to modern technology, getting your projects printed is now printed easy. But where can I print documents near me, luckily GD Print can help. Based in New Milton we ship all around the UK with factory collection options available. We print on demand any document that you may set up, from A4 printed documents to large print posters, we ensure every file is handled with care for a professional finish.
Final Thoughts on Creating Optimal Prints
Achieving a high quality print comes down to preparation: clear images, the right file types, correct document sizes, and professional print settings. Whether you need kitchen prints, bathroom prints, or banner printing, the key is to start with a properly set up design.
Looking to create your own professional posters, documents, or canvas prints? GD Print offers expert services across the UK — making printing easy, reliable, and high-quality.
Bringing 40+ years of print expertise to businesses across the UK. GD Print is a professional print company based in New Milton, serving customers across Bournemouth, Southampton, and the UK. We specialise in custom vinyl stickers, wall decals, and eco-conscious printing solutions.