Essential Bleed and Cut Mark Guidelines for Print: Why 3mm Matters
Essential Bleed and Cut Mark Guidelines for Print: Why 3mm Matters
When designing for print, knowing how to set up your file with proper bleed and cut marks is essential. These small adjustments ensure that your final product looks professional, with no unintended white edges or misalignment. We estimate based on our 40+ years of experience, that around 50% of print customers don't apply or understand bleed and cut marks in their print work. At GD Print, we always check with our customers if they want bleed/cut-marks and help them apply it, other printers might not, leading to un-satisfaction in your print product.
However, what is bleed? What is the standard bleed? How do I apply bleed? All relevant questions that this article will help to answer!
What Are Bleed and Cut Marks?
Before we jump into why these guidelines matter, let’s quickly define these key terms alongside a visual guide:
• Bleed: This is the area that extends beyond the edge of your final design. It ensures that when the paper is cut, there are no white borders or missing edges. • Cut Marks (or Trim Marks): These are small lines or markers placed at the corners of your design to show where the final cut will be made. They are essential for printers to know exactly where to trim each piece, ensuring the design is centred and consistent across copies. • Safe Zone: The area where your print will be, adjusted by a few mm for minor printing errors that may extend the trim line. | 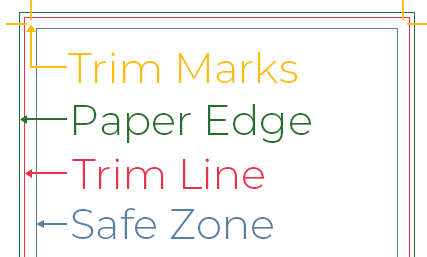 |
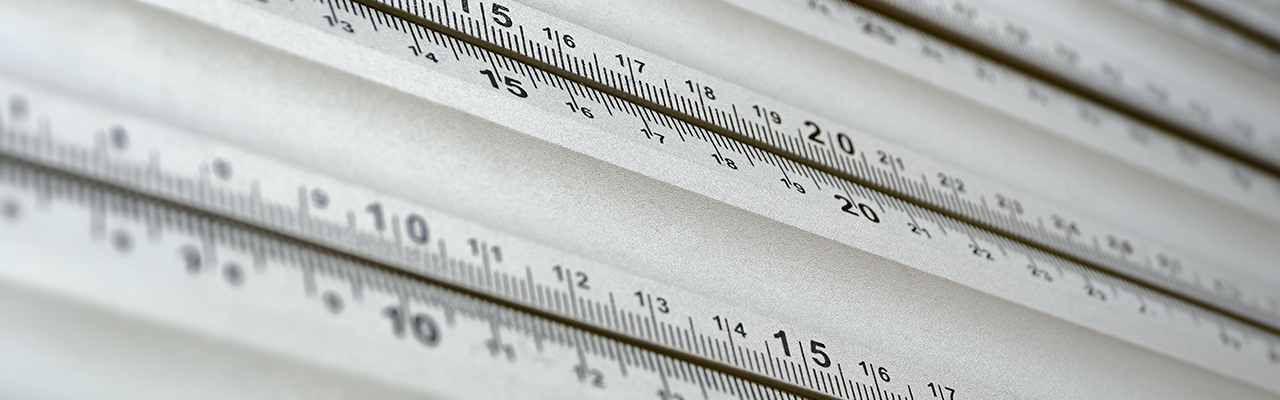
What is the Standard Bleed Size
What could be considered standard bleed size will always be controversial, as all printers have different needs as to why they need a specific bleed size. However, based on sources, the bleed area is usually 3mm to match most standard printing practices. [source] Standards are a metric that is based on an agreement from a vast majority. For a more official description from the government website:
"Standardisation is the process of creating, issuing and implementing standards. A standard is a document, established by consensus and approved by a recognised body. It provides rules, guidelines or characteristics for activities or their results so that they can be repeated. The aim is to achieve the greatest degree of order in a given context." [source]
Unlike something like paper sizing (discover our article here for information about paper sizing and standards) bleed and cut marks are entirely variable based on the printer, so no recognised body can define what should be standardised. We can make estimates based on what other printers also work from which is 2mm-5mm based on our sources here, but from our experience and what we follow ourselves, 3mm bleed is usually the standard bleed we encounter. At GD Print, we follow the standard 3mm bleed and cut mark guidelines for all standard print jobs, ensuring every piece is perfectly finished, but to make printing as accessible and easy as possible for the customer.
Here are some bleed numbers you might encounter for different products from other printers:
| Print Item | Typical Bleed Requirements | Why It's Needed |
| Business Cards | 3mm on all sides | Ensures colour or background design reaches edge after trimming. |
| Flyers & Leaflets | 3mm on all sides | Maintains full edge-to-edge printing across all flyer formats (A6, A5, A4, etc.). |
| Posters | 3-5mm on all sides | Prevents white edges on larger formats; important for framing or mounting. |
| Booklets & Brochures | 3mm on all sides | Maintains visual consistency across folded pages and cover spreads. |
| Large Format Banners | 5-10mm (sometimes more) | Allows for safe trimming or hemming, especially when eyelets or poles are added. |
| Stickers & Labels | 2-3mm (depending on cut shape) | Essential for die-cut or custom-shaped stickers to avoid unwanted outlines. |
| Folders & Packaging | 5-7mm bleed | Crucial for complex folds, flaps, or glued seams where precision is key. |
Why Is a 3mm Bleed Important?
This size provides a safe margin to account for any slight shifts or variations during the cutting process. This bleed number is perfectly neutral for if you need to edit this bleed number for a specific printer, you can very easily extend this to 5mm or reduce it down to 2mm. By including this extra 3mm around the entire edge, your design will look seamless, with colours, images, and graphics extending to the edge without any unwanted white space.
For example, if you’re designing a flyer that’s 210mm x 297mm (A4 size), you should set your document to be 216mm x 303mm. This adds a 3mm bleed to each edge of the document, giving the printer enough room for a clean cut. In addition to this, you can use a safe zone to ensure that absolutely zero errors in printing can occur, especially if your designs background is a standard white or cream paper stock.
Design with background outside the Safe Zone | Design with no background and inside Safe Zone |
 | 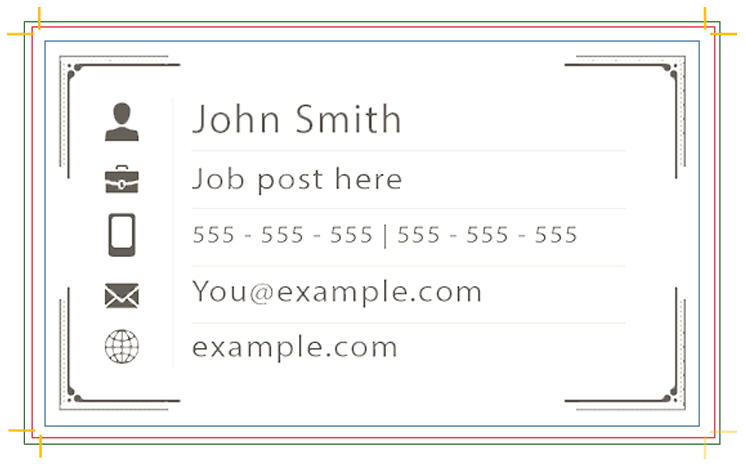 |
Setting Up Your Design for Bleed and Cut Marks
Whether you’re using Adobe Illustrator, InDesign, or another design tool, you can easily set up a 3mm bleed. Here’s a step-by-step guide:
1. Create a New Document: When you create a new file, set the document size to the final print size (e.g., A4, A5). Then, look for an option to add bleed—enter 3mm on each side (top, bottom, left, and right).
2. Extend Your Design to the Bleed Area: Make sure that any background colours, images, or design elements you want to extend to the edge reach into the bleed area. This way, there’s no risk of unwanted white edges after trimming.
3. Add Cut Marks: Many design programs allow you to add cut marks automatically. In Adobe software, go to the “Marks and Bleeds” section in the export or print settings. Select Trim Marks to add cut lines around the design, showing where the final cut will be made.
4. Export in Print-Ready Format: Save or export your file in a print-ready format, like PDF, with the bleed and cut marks included. Be sure to double-check that the 3mm bleed setting is maintained.
Avoiding Common Mistakes with Bleed and Cut Marks
Even with a simple 3mm bleed guideline, there are some common mistakes to avoid:
• Not Extending Images and Backgrounds: If you don’t extend your images or background colours into the bleed area, you might end up with a thin white edge after trimming. Always make sure that every edge reaches at least 3mm into the bleed area.
• Putting Text Too Close to the Edge: While bleed ensures the edges of your design are clean, keep any important text or logos at least 5mm inside the trim line, to the safe zone —it prevents any important content from being cut off.
• Forgetting to Check Bleed Settings on Export: Some designers forget to double-check bleed settings when exporting to PDF or other print formats. Always confirm that the file includes the bleed and cut marks before sending it to print.
How GD Print Handles Bleed and Cut Marks for a Flawless Finish
At GD Print, we’re committed to delivering the highest quality in every print job. By following a strict 3mm bleed and precise cut mark standard, we ensure that your designs look sharp and professional every time. Our team carefully reviews each file for proper bleed and cut mark placement, and we’re always here to help you set up your files for success.
If you’re unsure about your design setup, feel free to reach out. We can assist with adding bleed, checking cut marks, and ensuring that your design meets our print-ready requirements. Contact us here!
Bleed and Cut Marks FAQ
1. Do I need to add bleed and cut marks for all types of printed materials?
Yes, bleed and cut marks are recommended for any printed piece where the design reaches the edge. This includes flyers, brochures, business cards, posters, and more.
2. Can I add bleed after designing my file?
It’s best to set up bleed at the beginning, but if you forgot, most design software lets you extend your canvas size to add it afterwards. Just make sure you also extend any backgrounds or images to cover the bleed area.
3. Will GD Print check my bleed and cut marks?
Absolutely! We carefully review each file before printing and will let you know if there are any issues with bleed or cut marks.
Final Thoughts
Getting bleed and cut marks right is an essential step in preparing your files for print. By following a 3mm bleed standard and including clear cut marks, you’ll help ensure that your designs turn out perfectly, without unexpected white edges or cropped content.
At GD Print, with our 40+ years of print experience we take pride in our attention to detail and commitment to high-quality printing. Whether it’s your first print project or you’re an experienced designer, our 3mm bleed and cut mark guidelines make it simple to achieve professional results.
Bringing 40+ years of print expertise to businesses across the UK. GD Print specialises in high-quality, eco-friendly printing for every occasion. Proudly trusted by businesses in Southampton, Bournemouth, and across the South Coast.